Building a Real-time Sales Dashboard with WebSockets and Quarkus
A simple example to show how to use WebSockets with Quarkus


This post is the first of the article series about building real-time dashboards with event-driven technologies. As we progress through the series, you’ll learn things like:
Using a cache to speed up reads.
Update the cache in an event-driven way.
Listen to the change feed of a database like DynamoDB and update a dashboard.
Decouple database reads from writes using CQRS.
We’ll also be playing around with different technologies like Quarkus, Redis, RSocket, DynamoDB streams, etc while building them.
That looks promising, isn’t it? But we have to start from somewhere and take baby steps.
For today, let’s start with a simple example of a WebSocket server feeding real-time data into a dashboard.
What are we going to build?
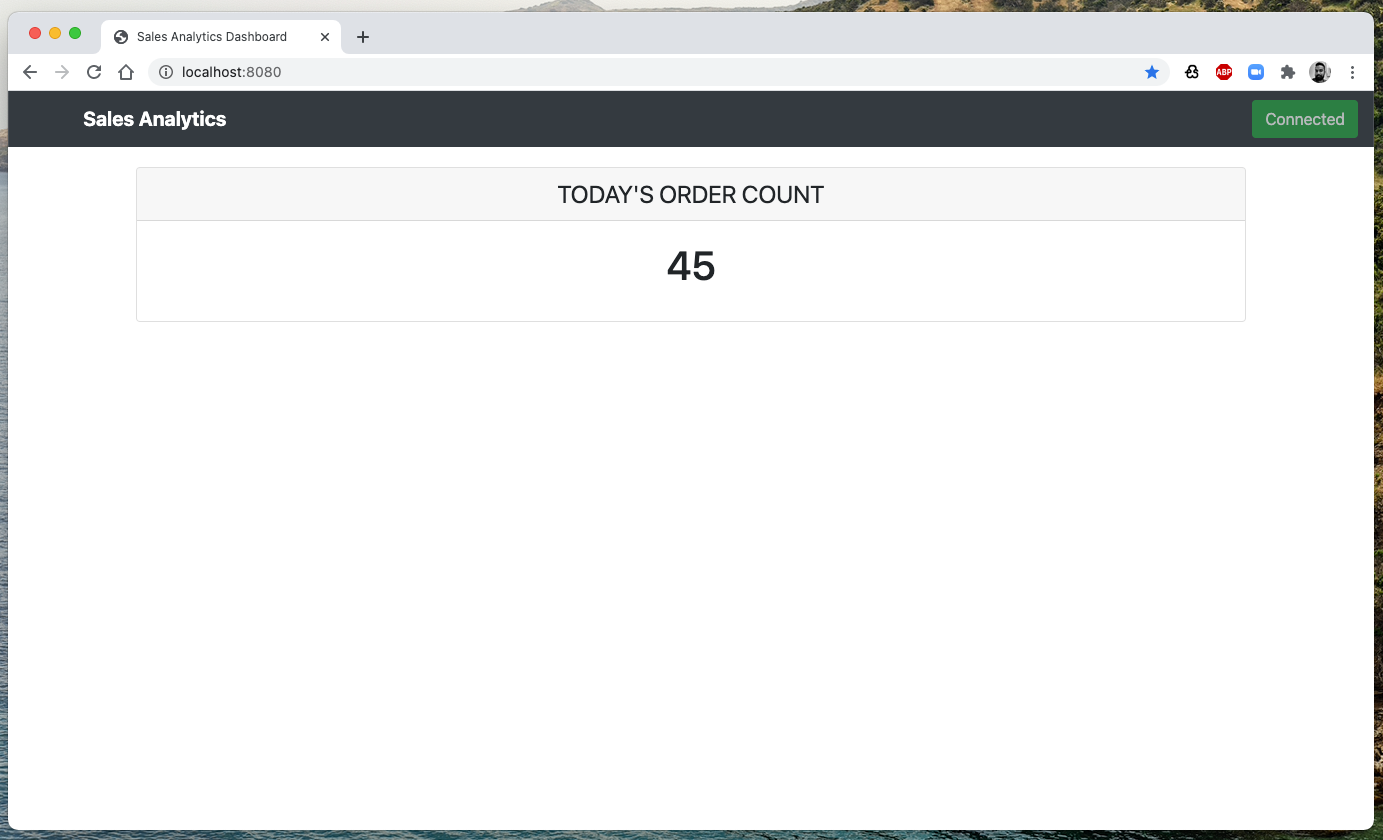
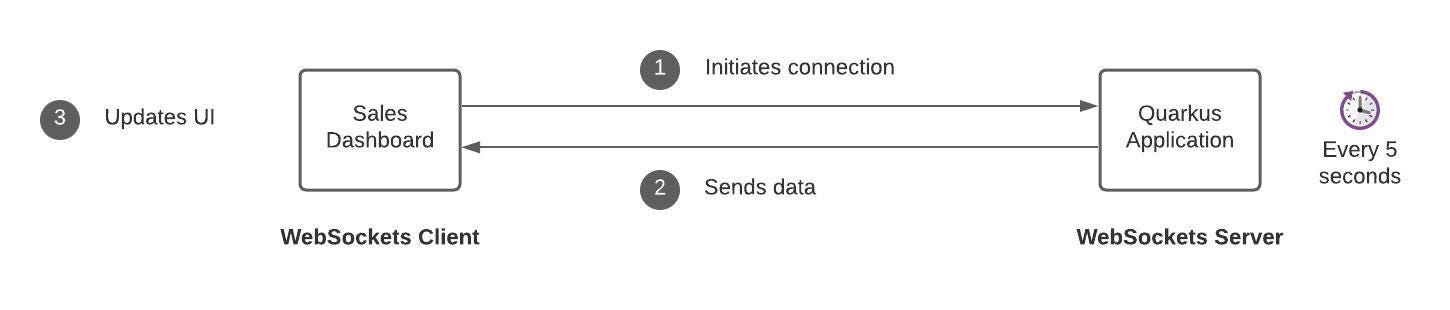
We will build a simple Javascript-based WebSockets client to display the current sales order count in a dashboard. We will use Quarkus to build the WebSocket server. Every 5 seconds, the server will push the current order count to the dashboard.
To get a high-level idea, refer to the following architecture diagram.
This post is not going to be an in-depth tutorial-style one. But I’ll explain the parts that are vital to the solution. You can find the complete working code in the following repository.
Before starting, make sure you have the following in your workstation.
JDK 1.8+ installed with JAVA_HOME configured appropriately
Apache Maven 3.6.2+
The WebSocket server
WebSocket has become the de facto standard of building real-time dashboards and data visualizations. Unlike traditional dashboards based on periodic polling of databases, WebSockets allows its client to listen to the data coming from servers. That enables the backends to send new data to dashboards at the same time when something happens.
The WebSockets server is a Quarkus application that uses the undertow-websockets extension. It feeds sales data to the dashboard client in real-time. When the application starts up, it creates a WebSocket server on port 8080.
The application has a single class that handles web sockets, which you can find at com.edu.retail.ws.DashboardWebSocket. It implements the standard WebSocket lifecycle methods onOpen(), onError(), and onClose().
The annotation @ServerEndpoint("/dashboard/{clientId}") marks the class as a WebSocket endpoint so that Quarkus will route any client request to there. {clientId} indicates the unique ID used by dashboard clients. The endpoint uses that ID to identify individual dashboards.
Notice the sessions hash map that stores sessions of all connected clients. A Session is how the WebSocket server communicates with the client. At onOpen, the client session is put into the sessions map. In the case of onClose or onError, the session is removed from the map.
onMessage is where we receive messages from the client. Since this is a dashboard, we don’t necessarily want to listen to incoming messages. The critical method is broadcast, which writes data to all connected sessions.
We will come to that in a moment.
The dashboard client
When the dashboard loads, it makes a WebSocket connection to the Quarkus application and starts listening to incoming data. When new data arrives, it will update its UI to show the current number of sales orders received today.
For simplicity, I wrote the entire dashboard using plain HTML and Javascript. Bootstrap and jquery are the only external libraries I’ve used.
You can find the dashboard implementation inside the META-INF/resources directory of the Quarkus application. Quarkus automatically serves static resources contained in the META-INF/resources directory.
The following file, META-INF/resources/js/dashboard.js contains the logic to handle the WebSocket connection.
Clicking on the Connect button establishes a WebSocket connection with the server. Since both client and server are running on the same process, we can use localhost as the hostname. The code generates a random string and uses it as the client ID.
socket.onmessage binds to a callback function that updates the content of a div with received data.
    socket.onmessage =function(m) {
        console.log("Got message: " + m.data);
        $("#totalOrders").text(m.data);
    };
An important thing to note is that even though WebSockets is a bidirectional communication protocol, I haven’t considered sending data back to the server. Usually, real-time dashboards operate unidirectionally, that is, to receive data from the server and render them on the UI.
The scheduled task
So far, we have looked at the WebSocket server and client. Now we need to push some sales data to clients. To mimic a real-world scenario, I have created a scheduled task to write random values to all the sessions periodically.
Creating a scheduled task in Quarkus is very easy. You need to add the scheduler extension to the project’s POM file and create the method that needs to execute on the given period.
In this example, I’ve created a new method increment() in the same DashboardWebSocket class. It increments the value of totalOrders and broadcasts to all connected dashboards every 5 seconds.
    @Scheduled(every="5s")
    void increment() {
        if (sessions != null) {
            totalOrders.incrementAndGet();
            broadcast(String.*valueOf*(totalOrders));
        }
    }
For more information on scheduling periodic tasks, Quarkus has an excellent tutorial you can follow.
Running the application
Now, let’s see our application in action.
Using a terminal, navigate to the location where you’ve cloned the repository and issue the following commands.
cd quarkus-websockets-dashboard
./mvnw compile quarkus: dev
Then open your browser window to http://localhost:8080/. Click on the Connect button and see the total number of sales orders changing every 5 seconds.